Table of Content
If youre doing your own nails, we recommend working on one hand at a time. If you have a friend to help you, however, you can speed up the process by having them paint one hand while the other is in the lamp. If you got the acrylic nails at the salon right before the coronavirus outbreak, you were faced with having to remove them all on your own. Sure, you have seen your nail tech do it all the time, but youve never done it on your own. There are few things that make you feel instantly put-together and glamorous as effortlessly as a fresh set of artificial nails.
Dip your acrylic brush into your bowl of monomer, tap some on the side so as to not over-saturate your brush, and dip into your clear powder. This process will create the perfect bead of acrylic—as opposed to a drippy or dry one—which you can then apply to the nail. Start just above your cuticle, and extend the mixture all the way to the end of your acrylic tip.
Navy Blue Stripes and Anchor Nail Design:
To replicate this look, Taylor suggests first applying Flawless Foundation Gel Base Coat ($29) and allowing it to cure before adding designs. "Repeat this process by filling in gaps down the nail. Cure." Apply a white nail base coat in ring finger and thumb.

In just 2-3 swipes you can easily get a wonderful nail design. Even you can use this as a base coat for your any boring nail paint. Just add this nail polish and this will give an extraordinary glossy finish. We highly recommend purchasing a gel nail kit, like the Gel Polish Pro Kit from Red Carpet Manicure. To do nail art, try water marbling your nails at home. To get started, apply a base coat to your nails, and fill a dish with warm water.
How To Apply Dashing Diva Nail Strips:
The purpose of a nail buffer is to prepare your nails to adhere to the gel polish not only properly, but longer as well. To achieve perfect buffing, you need a nail buffer made of fine grit. Nail salons rush to remove the gel nail polish on your nails without adequate time for them to soak.

In order to get the right acrylic nails done at home, you need the correct tools. This is everything from the powder, monomer, brush and more. The best way to get all these ingredients, without fully committing to buying full size, is to buy a kit. An acrylic nails at home kit, bring all the tools to easily try doing your nails at home without investing tons of money. If you find out this is something you dont like doing, at least you didnt waste a ton of money on products.
How to Do Nail Art
If that doesnt as well as you have hoped, consider soaking the nails for another 15 to 20 minutes. Now that your tips are applied and shaped to your liking, make sure you have all of your acrylic kit materials in front of you. Whether you’re using a kit or individual supplies, you’ll need to pour your liquid acrylic into the acrylic dish. Just keep in mind that acrylic has pretty strong fumes, so be sure to open a window while you’re performing this DIY process. It is easy, not harsh and only requires one item, a whitening toothpaste that contains baking soda and hydrogen peroxide. You know those donut-shaped stickers you used to use in school to repair your hole-punched paper when it ripped and fell out of your binder?
If none is indicated, 30 seconds is the typical amount of time. Make sure to buff your nails to make it a rough before you apply the polish for the best result. Cuticle oil helps to bring such nails back to shape, making them beautiful and smooth hence easier to paint on. If you've done the previous steps properly, all you have to do is wipe it off neatly, and you'll have your bare natural nails. Apply the cuticle remover liquid onto your cuticles and rub in. Use the the steel cuticle remover and scraper to push down your cuticles and scrape them off your nail.
If you're successful, you'll have an impressionistic Monet-inspired design. Dip a small brush, toothpick or pin into the polish you chose for the dots and lightly tap the implement on your nail. Continue doing this until your nail has as many dots as you want.
In my experience, when they grow out youre left with a big ol ratty mess, and maybe even an infection to boot. When I first started wearing Fake nails I experienced this a lot. Over time, working on my own nails and on clients in the Salon, there are a number of ways to get them to last a lot longer.
You may also want to consider purchasing a kit that comes with a few extra products, like cuticle oil or hand cream, to make your manicure even more pampering. Each step we mentioned is crucial, so you should follow all the steps without skipping any of them. Again, the best gel polish stands out We hae great options for your at-home gel nail manicure, so be sure to check out shouldn't miss our gel polish collections.
For other effects, you can create dots of varying sizes by using thinner or thicker-tipped implements. To make fading or trailing dots, dip the implement in the paint once and apply several dots without reapplying paint. You can also use your fine-tipped implement to drag the paint out from the wet dot to create rays, swirls and other designs. Looking for a beautiful and gorgeous way to add flair to your look? Nail art can complement your outfit for a special event or add a unique touch to your personality every day.
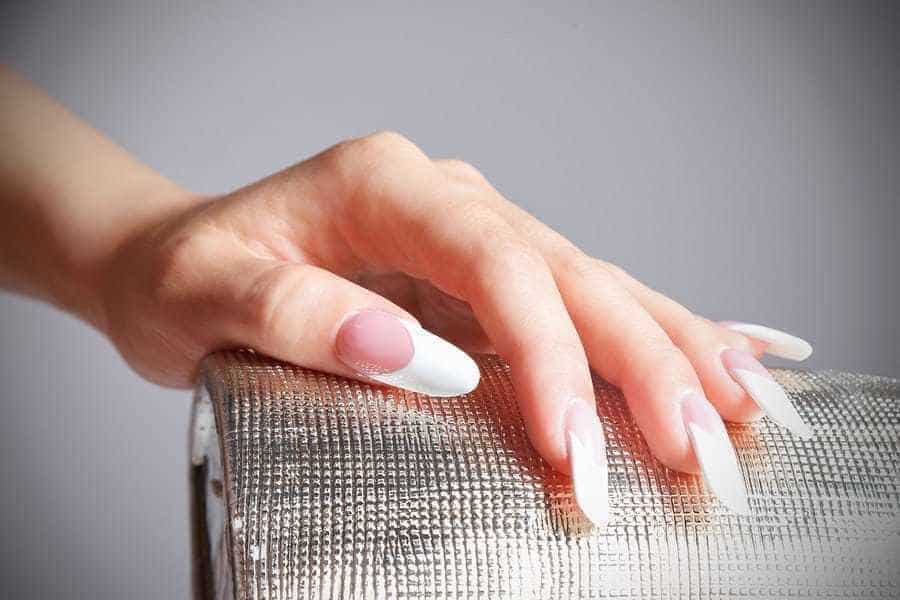
You want the bottom edge of the acrylic tip to be centered about one-third of the way down your nail so that it will remain sturdy as your nails begin to grow out. Apply pressure to the nail for five to 10 seconds to ensure that it’s secure and move on to the next tip until all 10 are complete. Plus, if you stock up on full-size products , you’ll be fully prepared to touch up your acrylics at the two-week mark instead of having to head to the store to do so. If you want to get even more customizable, Miss Pop advises picking up some blue painter's tape from a hardware store. "It doesn't leave a sticky residue and you can cut it into shapes," she says. "Apply it directly to the nail, then add your base and color coats around it. Lift the tape when the polish isn't completely dry but also isn't wet to the touch."
Even for Easters, this nail design is going to add more definition to your style statement. The half bunny faces at the tip of the nails are very easy to recreate. You can customize the base coat of your choice, but mostly soothing colors are preferred.
Once your materials are organized, it’s time to bring your acrylic manicure to life. This will help your acrylic mixture better adhere to your nails and tips. For a more durable look throughout the day, try sporting a French manicure.
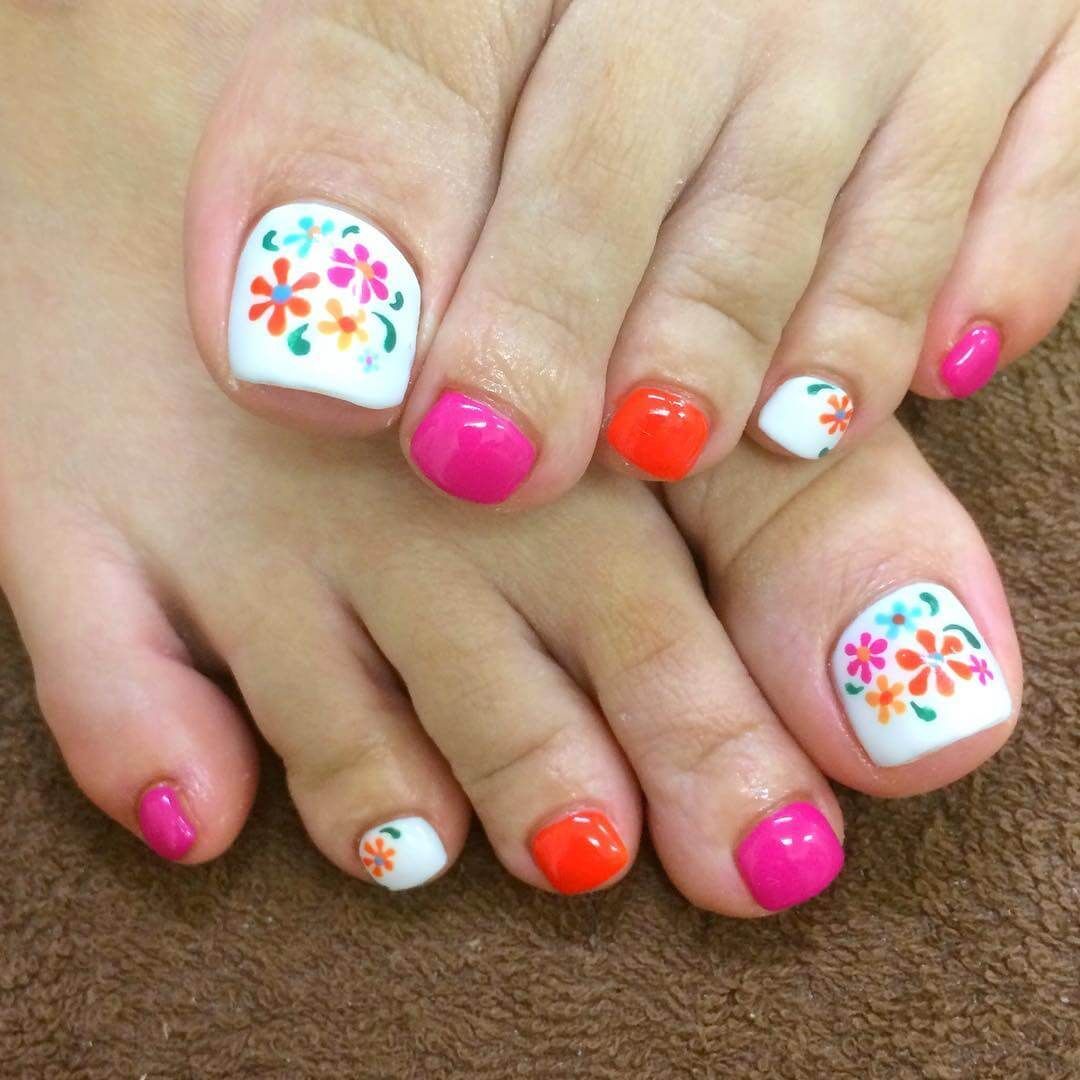
Nail designing is great to break the monotony of the old single nail polish trend. We mostly stick to the classic red or nude colors. We hardly experiment with various nail design colors and patterns.


No comments:
Post a Comment